Export with supplier Check-Out
- Start the UserClient and select the component that you want to export. Then click on Check-Out.
- The dialog Check-Out will now open.
- As with every Check-Out, you will need to transfer the files you want to export from the area Components on the server to the area Selected components using the > button.
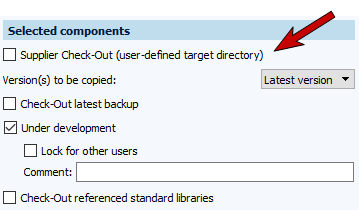
- Activate the checkbox Supplier Check-Out (user-defined target directory) in the section Selected components.
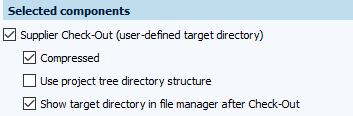
- Afterwards, the following additional options will be displayed:
- Select the checkbox Compressed if you want your files compressed as ZIP files
- Select the checkbox Use project tree directory structure if you want to keep the acess path We recommend using this step is you want to check out more than one component
- Activate the checkbox Show target directory in file manager after Check-Out to automatically open the target directory in the file manager after a successful Check-Out.
-
We strongly recommend activating the option Lock for other users if you want to check out projects for suppliers
-
Select the directory into which you want to export the files. Then click on the option ... next to the Target directory field
-
Click on the checkbox Check-Out if you want to perform other tasks in the dialog or click on Check-Out and close to close the dialog directly after completing the task
 Each time you check out a project for suppliers using the Supplier Check-Out, the SupplierChangeReason.txt and SupplierComment.txt files are also automatically checked out. These files are used to transfer the text entered by the supplier to the Change history tab.
 The file SupplierDeliveryNote.vdog-sdn will be automatically checked out. Under no circumstances delete the file. Otherwise, the project cannot be imported again via SmartImport.