Creating jobs
Requirements
To backup and compare the HMI Runtime during operation, (and before you can configure a job) you need to install a versiondog upload and compare agent on the WinCC station.
After installing agents, restart the WinCC station.
Configuring agents for SIMATIC WinCC jobs
- Start the AdminClient and open the Jobs module and select Agent configuration.
- Select Add agent and can configure the agent in Agent settings.
- In the field Agent address, enter either the computer name or the IP address of your WinCC station.
- Activate the Port for the upload agent and the Port for compare agent. The following ports are preselected as standard 64010 and 64011. During the installation of the versiondog system, the standard ports, required for the agents, are opened in the firewall. As long as the ports are not blocked by other applications, they can be used without being changed.
- In the field Comments, you can enter an appropriate comment to find the agents that you require.
- You will find all agents installed this way in the left dropdown box of the Agent settings with the IP address or computer name as well as with any entered comment.
- Test the connection to the agents using Test connection.
- Select Save and close.
Configuring WinCC jobs
- In the project tree, select your WinCC component.
- In the menu tab, select create or drag-and-drop the components into the jobs section.
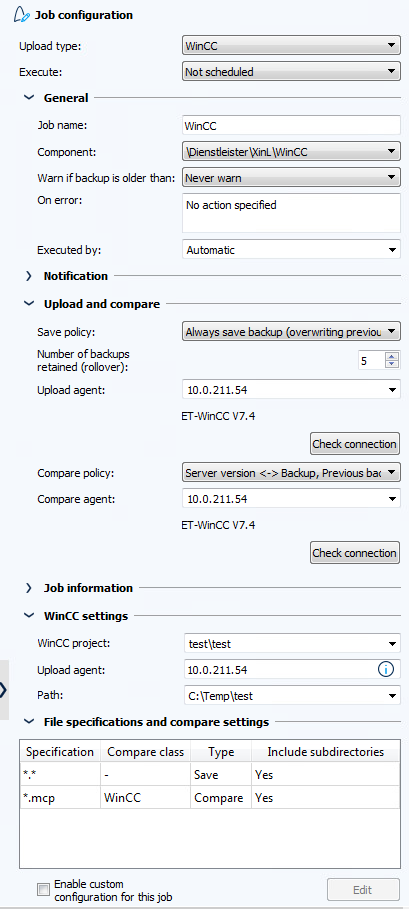
- Check in the section job configuration, if the upload type WinCC is being displayed.
- Make sure the desired settings are in place for the following sections: general, notification, upload and compare, create a version automatically after job run. The Notification and Create a version automatically after job run sections are only displayed if the necessary settings have been implemented.
- Activate the agents in the job configuration located under Upload and compare. This can be accessed via Upload agent and Compare agent.
-
Configure the WinCC settings:
- Under WinCC Project, select the WinCC project from the dropdown menu. If there is only one project in the component, it will be automatically selected.
- Under Upload Agent, enter the Upload Agent configured under Upload and Compare.
- Configure the directory you want to be backed up on the WinCC station under Path.
- Save the job by selecting Save and test it by selecting Execute selected jobs once.
- Check the checkbox under Enable custom configuration for this job if you want use special comparison settings.
- Click on Edit and the window Settings for backup files will open.
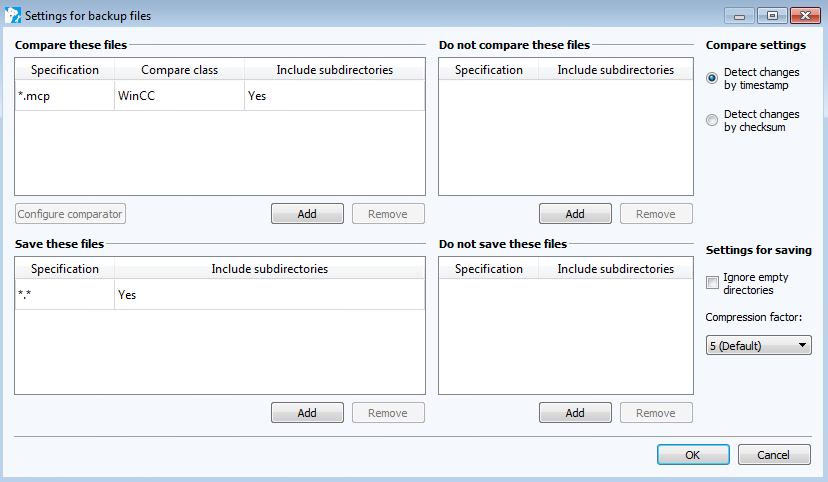
- Click on Configure comparator and the field Comparison configuration will open.
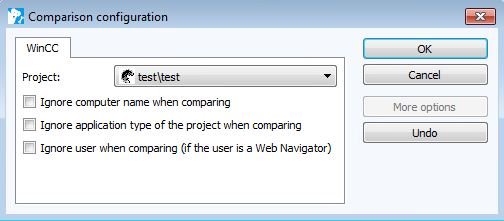
- In Comparison configuration, you can select one of the three following options:
- Ignore computer name in comparison: In certain circumstances, it can occur that the computer name is changed by WinCC (for example, one of the two comparison partners was allocated during visualization).
- Ignore application type of the project when comparing: In certain circumstances, it can occur that the application type is changed by WinCC (for example, one of the two comparison partners was allocated during visualization).
- Ignore user when comparing (if the user is a Web Navigator): Here, there are three options:
- Both comparison partners have the web navigator feature activated.
- In the case of different users, at least one of the users has the feature WEB - navigator activated.
- In the case of adding users / deleting users, the previous user has activated the feature WEB - Navigator.
- Select Save and test the job execution.
 You can make further settings for jobs of this upload type in the AdminClient by using the Global Job Settings dialog as well as the INI files.
|
During the course of a backup executed by and Upload and Compare agent, the WinCC compare process terminates with errors. What do I have to change in order to run the comparison without errors?
The following error messages can be seen in the Event log of Job module in AdminClient for the executed job:
Solution Adjust the settings of Microsoft SQL server in the PC where the agent is installed as described below:
Changes properties of protocol TCP/IP
Restart SQL Server
|

| Related topics: |
|---|
| About versiondog -> Term Jobs |
| Upload and Compare agents -> Installing and updating agents |
| AdminClient -> Job configuration |
| AdminClient -> Adding additional job settings |