Start agents as applications
For some devices (for example TIA Portal with software upload) it is necessary that agents are started as applications instead of only as services. If the service is started as an application, it behaves in the same way as a manually started application (for example a web browser).
To start a service as an application, follow the steps in A or B. You have the option in option A (create a shortcut) to set the program to run as administrator. If you then place them in the startup folder (A), you can automate the execution.
 Before the MasterService or the agents can be started as an application, you need to ensure that the agent services (VDogUploadAgent and VDogVCompareAgent) have been ended. This can be done for example with the Task Manager. Afterwards, you will need to deactivate these services in Windows. This ensures that these services are not automatically restarted after a reboot of the computer.
A. Create a shortcut
- Open Windows Services and view the properties of the Agent service.
- Copy the path to the service into an editor, for example Notepad.
-
Adjust the path based on the description that corresponds to your Windows version:
- Windows 10 and Windows Server 2016:
-
Older Windows versions:
Example:
Copied path:
“C:\Program Files (x86)\vdogAgents\VDogCompareAgent.exe" /at:s /rd:D:\vdAgentArchive“ New path.
Powershell Start-Process -Verb Runas
-FilePath 'C:\Program Files (x86)\vdogAgents\VDogCompareAgent.exe'
-ArgumentList '/RD:D:\vdAgentArchive','/AT:S','/app','/visible'Be sure to replace double quotes (") with single quotes (').
Example:
Copied path:
"C:\ProgramFiles(x86)\vdogAgents\VDogCompareAgent.exe" /at:s /rd:D:\vdAgentArchive New path:
"C:\ProgramFiles(x86)\vdogAgents\VDogCompareAgent.exe" /at:s /rd:D:\vdAgentArchive /app /visible The /visible addition opens an application dialog for the process. This entry is optional. - Create a new shortcut (for example to your desktop).
- Paste the copied (and adjusted, if necessary) path in the field of the dialog.
- Click Next and name the shortcut.
- Click on Finish.
-
If you are running an operating system older than Windows 10 or Windows Server 2016, follow these steps:
- Open the properties of the shortcut you just created.
- In the Compatibility tab, click Change settings for all users.
- Check the checkbox Run program as administrator.
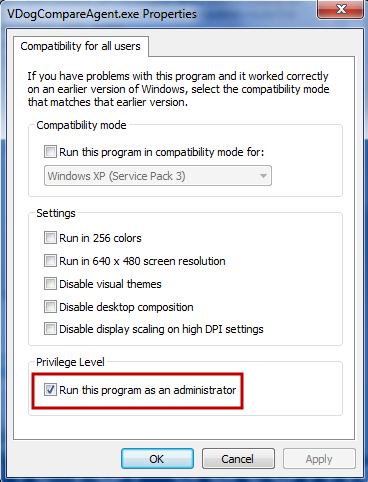
Image: Properties VDogCompareAgent.exe
-
If you want the agent to run automatically, perform the following steps:
- Move the shortcut to the Startup folder, usually C:\Users\auvesy\AppData\Roaming\Microsoft\Windows\Start Menu\Programs\Startup
-
In the User Account Control settings, select Never notify to avoid displaying a User Account Control (UAC) prompt after automatic login.
If the User Account Control (UAC) prompt cannot be turned off, it is not possible to run the shortcut automatically as an administrator. The shortcut must then be manually executed again by the Windows user after each restart.
Image: Create link dialog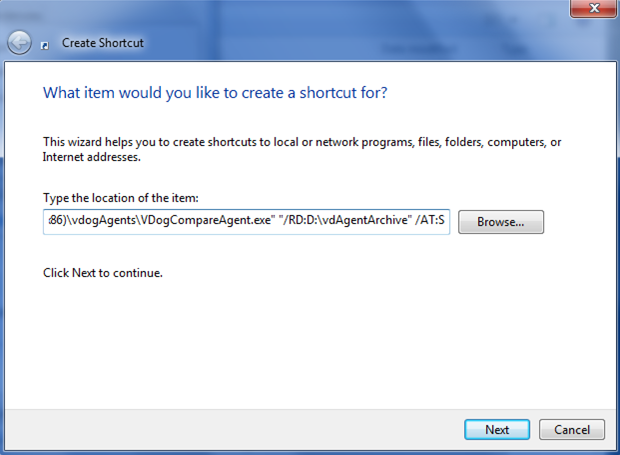
B. Via the command line
- Enter the following commands (depending on your application):
- To automate the execution as an application, create a batch file, copy the path in the file and copy the batch file to the autostart folder. Each batch file can contain only one path.
- Start the agent application by right-clicking on the batch file and selecting the Run as administrator option.
|
"C:\Program Files (x86)\vdogAgents\VDogCompareAgent.exe" /at:s /rd:D:\vdAgentArchive /app |
|
"C:\Program Files (x86)\vdogAgents\VDogUploadAgent.exe" /at:s /rd:D:\vdAgentArchive /app |
This procedure can also be used for the MasterService.